The Vilcabamba trek to Machu Picchu is a hidden treasure that has yet to be heavily impacted by tourism. The trail is remote, very beautiful, and super quiet.
The trek is typically completed on a 5-day itinerary, although there are variations. Trekkers get to pass through snow-capped mountains and walk on well-preserved Inca trails (read a short history of the Inca trail).
I hiked the Vilcabamba in 2014.
In this article, you will find all the information you need for an amazing Vilcabamba trek experience. This includes when to hike, what to pack, and detailed route options.
I will also answer some of the most frequently asked questions about Vilcabamba Trek. You may want to bookmark this page for future reference.
Get a Machu Picchu trek quote
Start planning your Machu Picchu hiking holiday.
Vilcabamba Trek to Machu Picchu - An Off-The-Beaten Path Experience
Vilcabamba Trek Overview and Highlights
There are a few reasons you should add the Vilcabamba trek to your Peru Itinerary. This off-the-beaten-path hike is the perfect challenge for experienced hikers. It offers untouched landscapes and an authentic Andean trekking experience.
And the best part? You do not need a permit to hike Vilcabamba. This makes it relatively easy to book a spot on a tour any time of year (although there are only a few operators that offer it).
If you enjoy hiking in peace, this trail is for you. Due to its difficulty and longer itinerary, very few people walk this trail. You can trek for hours without seeing another soul. This allows you to fully appreciate the landscapes of snowy peaks and dramatic valleys.
Another bonus of the Vilcabamba trek is seeing different Incan ruin sites. Vitcos-Rosaspata and the Ñustahispana (the White Rock) are hidden gems. These sites are rarely visited. When exploring these ruins, you will have them all to yourself. Of course, you will also get to visit the famous ruins of Machu Picchu during your trek.
Looking for a day tour? Here are my 5 favourite day tours around Cusco:
- Rainbow Mountain day trip (with meals)
- Moray and Salt Mines Quad Bike Tour
- Sacred Valley day tour
- Humantay Lake day tour
- Machu Picchu and Huayna Picchu entrance tickets
See more Cusco day trips.
How Difficult Is The Vilcabamba Trek?
I am a huge fan of the Vilcabamba trek. Even so, I should point out that it is one of the more challenging hikes to Machu Picchu. There are several tough ascents and descents that require a good level of fitness.
The route is approximately 50-60km / 30- 38 miles long. The trekking days are long and tiresome and there are some serious mountain passes to conquer. To successfully complete the Vilcabamba trek, you need to be in extremely good physical shape.
See more Machu Picchu route options.
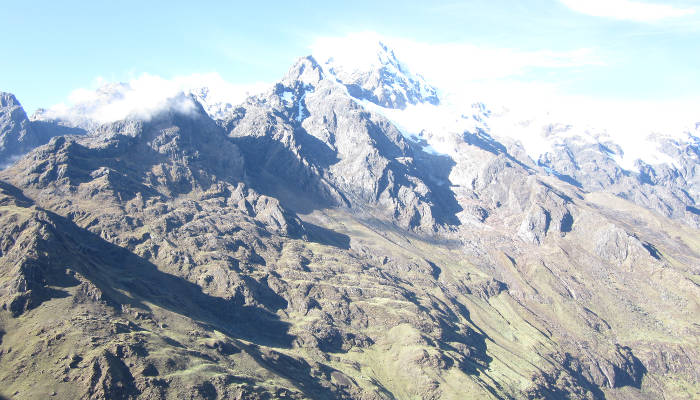
Mount Veronica (5680m / 18635ft). Veronica is the highest peak in the Cordillera Urubamba range. Its Quechua name is Wakay Willca, which means “Sacred Tears”. This image was taken from the other side of the Sacred Valley, near Abra Malaga Pass
What is The Highest Point On The Vilcabamba Trek?
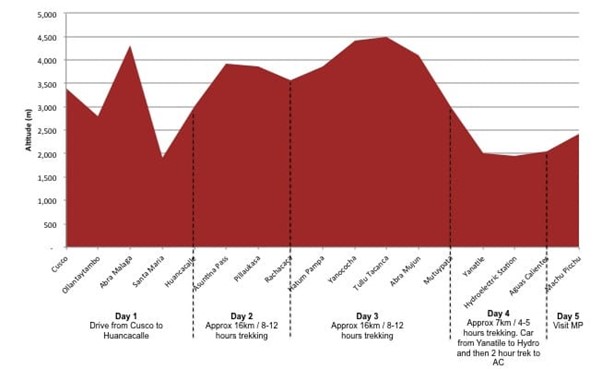
Tulla Tacanca is the highest pass on the Vilcabamba Trek. It sits at 4,500m / 14,760ft) above sea level.
Yanacocha is the second-highest pass on this trail. It is not much lower than Tulla Tacana at 4,450m / 14, 501 ft above sea level.
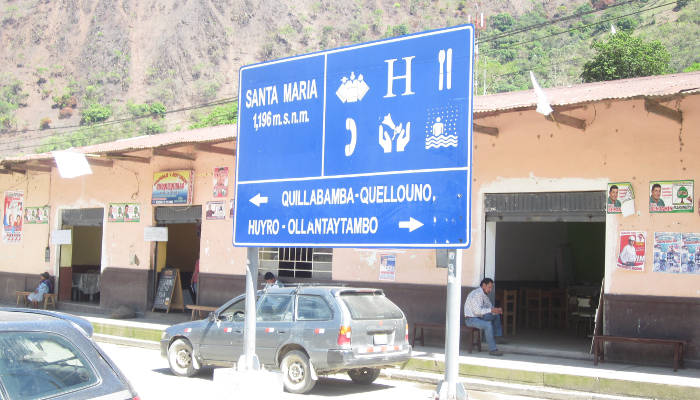
Santa Maria
Vilcabamba Trek - Route Options
See more info below on a typical itinerary for a 5-day Vilcabamba trek to Machu Picchu.
Day 1: Cusco - Abra Malaga - Huancacalle
On the first day, you will have a very long drive (8 hours) and only a short, 2-hour hike.
Tours generally start very early around 4 am. Trekkers are transported from Cusco to the town of Ollantaytambo (see hotel options in Ollantaytambo) where you will likely stop for breakfast. You will then continue up and over the impressive Abra Malaga Pass at 4,316m / 14,160ft.
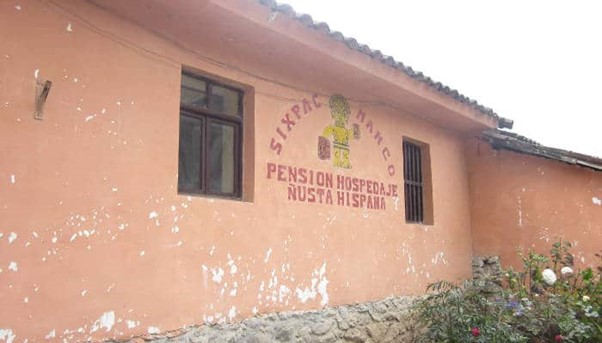
The Sixpac Manco Hostel is located at the end of Huancacalle Town.
From here, you will descend into the Vilcabamba valley to Santa Maria or Chaullay (1,890m / 6,200ft). Some companies start trekking at Chaullay. If not, then you might drive on to Huancacalle, which will be your camp for the night.
The archaeological sites of Vitcos-Rosaspata and the Ñustahispana (the White Rock) are a 1-2 hour hike away from Huancacalle. You will visit them in the afternoon.
Hiking distance: ±6km / 4 miles (10-12 hours)
Please Note: For DIY Vilcabamba trekkers, there are a few accommodation options in Huancacalle. There is a hostel right at the end of the town where you can get a bed for around 20 Soles.
Day 2: Huancacalle - Racachaca
Day 2 is a big hiking day. It starts with a 4-5 hour climb up to the Asuntina (also called Azotina) Pass (3,915m / 12,844 ft). From the top, you will be presented with great views of the river and valley below. You can also see the snowy peaks of Lasoma from here.
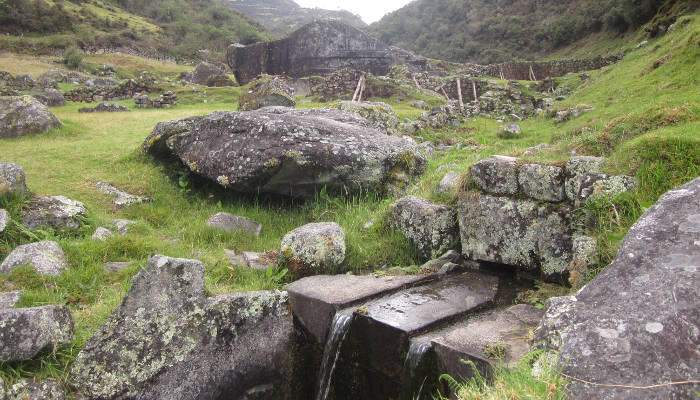
Ñustahispana (the White Rock) seen in the distance, with an Inca fountain representing the duality in the foreground
From here, you will descend along an original Inca trail to the small village of Pillaukasa (3,860m / 12,664ft). Your campsite is a little further on at Racachaca (3,570m / 11,712 ft).
Hiking distance: ±16km / 10miles (10-12 hours)
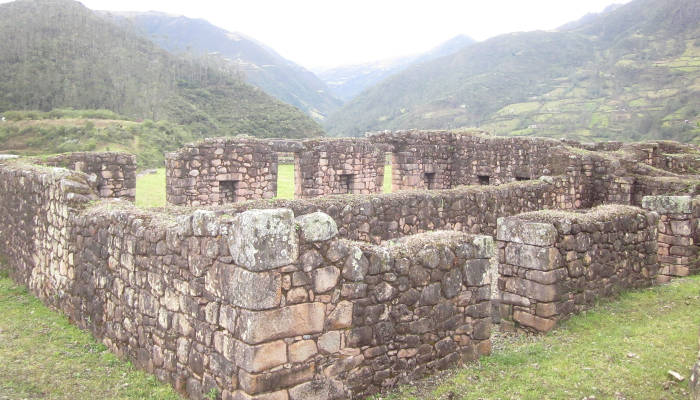
Vitcos-Rosaspata, an interesting Inca site located near the town of Huancacalle.
Day 3: Racachaca to Mutuypata
This is the toughest day on the Vilcabamba trail by far as you will traverse three high passes. The day begins with a trek up past Hatum Pampa (3,860m / 12,664ft). You will then move onto the first pass, Yanococha (4,420m / 14,501ft).
The trail goes downwards to Yanococha Lake before continuing up to the second pass, Tullu Tacanca (4,500m / 14,760ft). From here, you will descend to the third and final pass, Abra Mujun (4,100m / 13,450ft).
From Abra Mujun, you will trek down to the campsite at Mutuypata (3,000m / 9,840ft). The route goes via the small villages of S’aqra Cocha and Laccococha.
The trail on the latter half of this trek is very muddy, which is particularly through the months of October-April. I highly recommend taking gaiters to wear during your trek (see our packing list here). Although this is for the Inca Trail, it is perfectly suited for the Vilcabamba trek as well.
Hiking distance: ±16km / 10miles (10-12 hours)
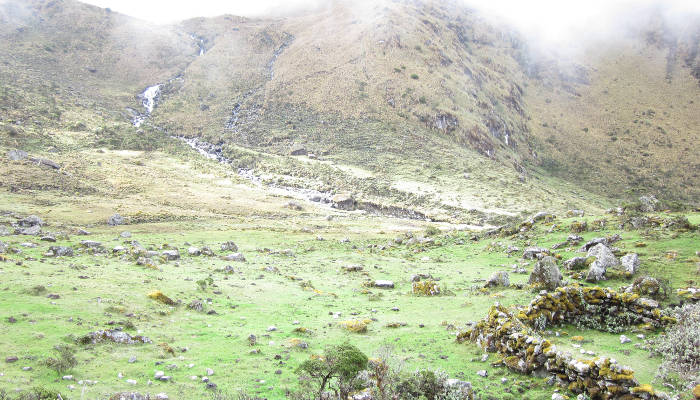
The Valley below Abu en route to Matuypata (before the seriously muddy section).
Day 4: Matuypata - Yantile - Hydroelectric Station - Aguas Calientes
Day 4 begins with a gradual 4-5 hour descent to the village of Yanatile. On the way, you will pass through a warmer jungle habitat, Coffee and fruit plantations characterising this part of the trail.
From Yanatile, most tour operators use land transport to head to the Hydroelectric Station for lunch. You will continue the hike on the trail parallel to the railway tracks. This is 10km / 6.2miles over flat land. The rails take you to the town of Aguas Calientes, which typically takes about 2 hours of trekking.
If you are exhausted by this stage, you can catch a train from the Hydroelectric Station to Aguas Calientes. A ticket will set you back $25 for a 45-minute journey.
You will stay overnight in a hotel or hostel when you arrive in Aguas Calientes. I highly recommend taking the opportunity to soak in the town’s famous hot springs. Remember to bring a bathing suit with you!
Hiking distance: ±17km / 10.5miles (6-7 hours hiking and a 1-hour drive)
Please Note: These are some of Peru’s busiest hot springs. Be prepared to share the warm waters with a lot of other tourists.
Day 5: Aguas Calientes - Machu Picchu - back to Cusco
Day 5 of the trek begins with an early start (typically before dawn) on the first bus up to Machu Picchu. This will give you a chance to witness sunrise at the Watchman’s Hut. If you move fast, you may even make it to Inti Punku in time for first light, which is a glorious experience.
Most operators provide a 2-3 hour guided tour of the city. Afterwards, you will then be allowed to explore the ruins on your own.
Please Note: If you would like to spend more time at Machu Picchu, you will need to request this when booking your trip. An extra day means securing an additional night in Aguas Calientes. It also requires a second permit for the citadel. This is very tough to arrange at the last minute, so make sure you plan your trek itinerary carefully.
It is worthwhile securing a permit to climb Huayna Picchu (the large mountain behind the city). If you have the energy for an hour’s climb up the steep stairs, the views from the top are excellent and well worth the exertion.
There are only 400 Huayna Picchu climbing permits available every day and only two climbing times (7 am and 10 am). Make sure to secure your place early (i.e. well before you arrive in Peru).
You will need to get back to Aguas Calientes before your train departs for Ollantaytambo. Your tour operator will inform you of the time that you need to return during your time in Machu Picchu.
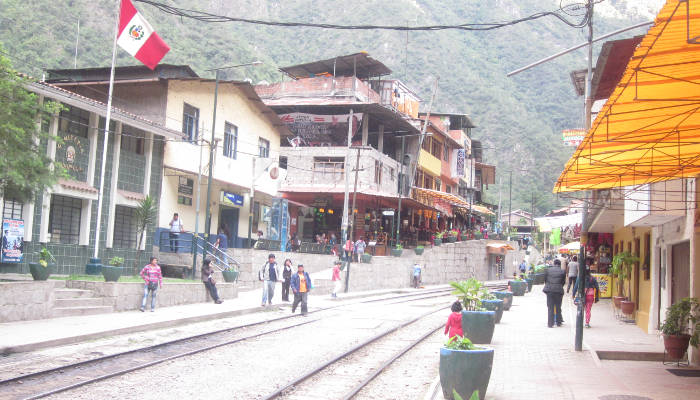
Aguas Calientes, the town below Machu Picchu (often referred to as Machu Picchu town).
Route and Altitude Map
Good trekking maps are hard to come by for quiet routes like the Vilcabamba trek. The map below is from the Trailblazer Guidebook, the leading guidebook for alternative Machu Picchu treks, an essential item in our trekking library.
This map provides the geographic position of the Vilcabamba trek and its general route.
Please Note: The map is not to scale, so please ignore the map key.
Trace your eyes from Cusco in the Southeast up to Ollantaytambo. You will see the route a car or train follows into the Sacred Valley.
Just North of Ollantaytambo, you can see Mount Veronica (5,860m / 19,226 ft). Adjacent is the Abra Malaga Pass (4,316m / 14,160 ft).
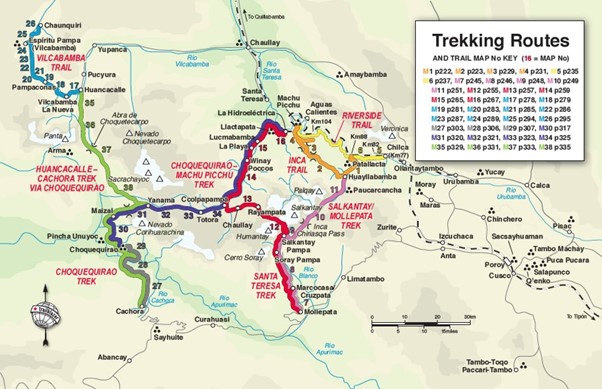
From here, you will drive along the Rio Vilcabamba through Chaullay and onto Huancacalle in the Northeast. This entire section between Cusco and Huancacalle takes 8-9 hours of driving.
Please Note: There is an hour-long drive between Yanatile (not shown on the map) and the Hydroelectric Station.
Although not perfectly correct, the route follows the green line and then the dark blue lines. It goes all the way up to the Hydroelectric Station (labeled as ‘La Hidroelectrica’ on the map). This is approximately 60km / 37miles and 3 days of trekking.
The altitude profile of the Vilcabamba Trek looks as follows below.
Vilcabamba Trek Alternatives
As you can see from the map above, there are two interesting variations on the Vilcabamba Trek.
Vilcabamba and Choquequirao Trek
The first is a combination of the Vilcabamba and the Choquequirao trek. This route is ideal for trekkers who have already seen Machu Picchu. It is a good choice if you are looking for a challenging adventure. Choquequirao is a well-preserved Inca site that can only be reached on foot.
The route typically starts in Huancacalle and follows the green line south to Cachora. It is possible to do the trek the other way around too. The route takes between 7 and 8 days to complete.
Please Note: This trek is not widely offered by all Peruvian tour operators.
Vilcabamba Trek, Espiritu Pampa and Machu Picchu
This is the ultimate Machu Picchu Alternative trek. It combines the Vilcabamba and Choquequirao trek (the green line above) as well as the Espiritu Pampa archeological site. This is represented by the light blue line above Huancacalle on the map above.
The route typically traverses South to North - from Cachora to Espiritu Pampa and onto Chaunquiri. It is an epic 11-12 days of trekking.
Hikers are transported by vehicle to Quillabamba with most people staying overnight. In the morning, you will take a bus to the Hydroelectric Station. The road goes via Santa Teresa and onto Aguas Calientes. The trek culminates with a full day at Machu Picchu.
This is one of Peru’s most rare trekking routes. However, there are limited options when it comes to tour companies offering it.

Get a Machu Picchu trek quote
Start planning your Machu Picchu hiking holiday.
Can You Do Vilcabamba Trek Without A Guide?
As previously mentioned, Vilcabamba is a challenging trek. You should only consider this hike if you are fit and have some experience on multi-day treks.
Previous trekking experience is twice as important if you are wanting to hike Vilcambamba unguided.
If you are considering hiking Vilcabamba unguided, you need to know the following:
- No permit is required to hike the Vilcabamba trek.
- You can reach Chaullay or Huancacalle (the starting point) by public transport. Private transfers are also available but a lot more expensive.
- There are no designated campsites. There are some towns along the way where you can find accommodation.
- You will be able to buy food in some towns along the way. However, you should pack some snacks and lightweight meals to play it safe.
- Drinking water along the trail is not reliable, so hike with a filter bottle or purification tablets.
- There are a few toilets along the trek. In some places, you can pay homeowners 1 sol to use el baño. Bring coins and your own toilet paper.
- Download an offline GPS application before leaving. We couldn’t find an app with the entire trail mapped out. However, having an offline GPS system will help you orientate yourself if you get lost during your trek.
As with all trekking in South America, it will help you a lot to speak basic Spanish. Even knowing a little will help you find directions, accommodation, and (importantly) toilets!
Where to stay? Here are 5 of my favourite accommodation options in Cusco:
- Sonesta Hotel (great 4 star hotel)
- Antigua Casona San Blas
- El Mariscal Cusco (very good value)
- Hotel Paradis (good 3 star hotel)
- Quechua Hostel Recoleta (cheap and cheerful)
See more Cusco accommodation options.
Best Time For A Vilcabamba Trek
The Vilcabamba trek is best done during the dry season (May-September), the peak time on the four day Inca Trail. However, on Vilcabamba, you will be lucky to see more than a handful of trekkers (bliss!!).
I do not recommend doing the Vilcabamba trek during the wet season (October-April). Rain and fog are common and obstruct the incredible views along the trail, and pose as potential risks for hikers.
At a push, you could get away with a trek during the dry season shoulder months (October and April). With that said, it’s still better to stick to the dry season for optimal hiking conditions.
Micro-climates predominate in the Andes, so plan for hot afternoons and cool to cold nights. There is a possibility of encountering some rain all year round, so bring along some waterproof clothing too.
Full historical details on weather patterns in and around Machu Picchu can be found here. Also see my guide on the best time to hike the Inca trail.
Acclimatization and Altitude Sickness On The Vilcabamba Trek
Cusco, the town you fly into before your trek, is situated at 3,400m / 11,150ft. You might start feeling the effects of the altitude as soon as you arrive. The trick is to stay hydrated and drink plenty of coca tea. Every hotel and guesthouse has coca leaves available.
Don’t over-exert yourself by traipsing across the city though. If you booked with a tour operator, they will likely have organized your hotel accommodation. You will probably also have some scheduled city tours ahead of you, so try to pace yourself wherever you can.
The benefit of spending two days in Cusco is that you acclimate to a higher altitude very early in your tour. This makes going over the 4,500 metres (14,764 feet) passes easier.
You also have the option to descend immediately to Ollantaytambo for acclimatization. This is a quaint town 60 km (37.3 mi) northwest of Cusco in the Sacred Valley (2,792 metres / 9,160 feet).
It is impossible to predict whether you will experience altitude sickness. There is little correlation to factors of age, gender, fitness, etc.
With that said, it is important to understand the symptoms of altitude sickness. Read up on best practice methods to prevent any serious health complications. I recommend our detailed guide on acclimatization and altitude sickness.
Vilcabamba Packing List
The packing list for a Vilcabamba trek is almost identical to an Inca Trail equipment list. The only noteworthy item that is unique to the Vilcabamba trail is gaiters. These are particularly handy on the afternoon of day 3 to protect against the rain and mud.
Training, Fitness, and Preparation
The Vilcabamba trek is a real challenge. You will need to be physically fit and mentally strong to enjoy this trek fully.
If you are not already doing weekly fitness activities, you should get started! The sooner you start training, the better. At a minimum, you should start a fitness regime 3 months before taking on this trail.
The best exercises for building hiking fitness are cardiovascular activities. Start with walking and build up to jogging. Swimming and cycling are also good activities for building hiking muscles.
Cardiovascular fitness will improve your body’s oxygen utilization. This is important for hiking in high altitudes and preventing or limiting potential altitude sickness.
You also need to spend time hiking in mountainous terrain with a weighted backpack. Some light weights and strength training are good additions to a workout routine.
Check out our Inca Trail training and fitness guide. You can also look at our training program for the Machu Picchu. Both are applicable to Vilcabamba.

Get a Machu Picchu trek quote
Start planning your Machu Picchu hiking holiday.
Trekking Insurance
Insurance for your trek to Machu Picchu is a must. Most operators will require you to carry sufficient travel insurance for your trek.
The Vilcabamba trail to Machu Picchu goes over 4,000m / 13,123 ft passes. You will need to make sure your insurance covers you for high-altitude hiking (up to 6,000m / 19,685 ft).
After trying out a number of travel insurance providers, the most affordable and best by far is Rise & Shield.
Conclusion
Do you have any other questions about the Vilcabamba trail? Or, do you want to add your experience to this article? Please leave a comment below, we welcome questions and constructive feedback.
Please feel free to share this page with friends and family or link it to your blog. We always welcome a shout-out on your social media page.
If we haven't answered your questions in this article, leave a comment below and we will respond within 24 hours.
Tags: Vilcabamba Trek, Vilcabamba Inca, Vilcabamba Peru, Vilcabamba Trail, Vilcabamba Ruins, Vilcabamba to Machu Picchu
References: (1) Wikipedia (2) Inca Trail Trailblazer Guide (3) Personal experience (4) Interviews with local guides we are friendly with

Thanks for sharing! If I hike northbound from Cachora to Chuanquiri, what is the transportation situation once I arrive in Chuanquiri? Do I need to reserve in advance? Thx
Hi Jason, I’m not sure about transportation but I’m pretty confident you can organise something from Cusco.